
Table of Contents
- What is E-Wrap Cast On?
- The Process:
- Step 1. Prepare the knitting machine settings.
- Step 2. E-wrap the working needles starting with a slip knot on the furthest needle from the carriage
- Step 3. Thread the carriage with the working yarn.
- Step 4. Move the carriage from right to left.
- Step 5. Attach the cast-on comb and the weights to the first row of stitches.
- Step 6. Knit your project.
What is E-Wrap Cast On?

In machine knitting, e-wrap (aka e-loop) is a type of cast on in which yarn is wrapped around each needle counterclockwise forming loops that are shaped like a lower-case cursive letter “e”.
Unlike open cast on, it gives a secured finished edge to your knitting. E-wrap cast on stands on its own and it gives a neat border to the garment. How to cast on a finished edge using the e-wrap method on a flatbed knitting machine?
Follow this tutorial for step-by-step instructions with photos. Or, see the outline above for a quick review.
Let’s get started by setting up the knitting machine.
The Process:
Step 1. Prepare the knitting machine settings.
Before we begin the e-wrap cast on, we need to make sure the knitting machine settings are correct.
Set the working needles to the holding position.
Push the working needles into the holding position (HP). (D-position on Knitmaster, Empisal, Silver, Singer, and Studio; and E-position on Knitking and the modern Brother.) These needles, however, should be engaged in knitting, and not just holding. To accomplish that, make sure the carriage settings are correct.

Set the cam lever on the carriage to the normal position.
Switch the holding cam lever to the normal position to ensure that the machine operates the needles as working and not holding needles. (The cam lever setting is N in Brother/Knitking, triangle in Singer/Studio machines).


Side note: If you set the lever to the holding position and push out the needles to the holding position, and then move the carriage across the needles (in either direction), the machine will not move these needles back to the working position (B-position).
You can test your machine for the correct settings. Push a few needles all the way out to the holding position. Then change the lever, and move the carriage from side to side across the needles. If the needles will stay in the same holding position, the cam lever is not set correctly. If the needles move to a working position, it means that the carriage is set to a working position. You need the working setting.

Place the carriage on the opposite side from the starting needle of the e-wrap. The right side is most commonly used.
The carriage can be on either side of the needles. But it should be on the opposite side from the starting needle.
E-wrap begins with the needle furthest from the carriage and moves towards the carriage. If the carriage is on the right, the e-wrap begins on the left and ends on the right. This is easier for a right-handed person. If you place the carriage to the left of the needles, you need to e-wrap the needles from right to left with the working thread facing the carriage.
For the sake of this exercise, park the carriage on the right of the needles.

Run a test pass.
Pass the carriage from right to left to make sure the working needles move from the holding to the working position.

Now, repeat the test from left to right. Push the needles back to the holding position and run the carriage to the right (back to its original place). The test run should set the needles from the holding to the working position again.


Now, that the machine is set, we can start e-wrapping the needles.
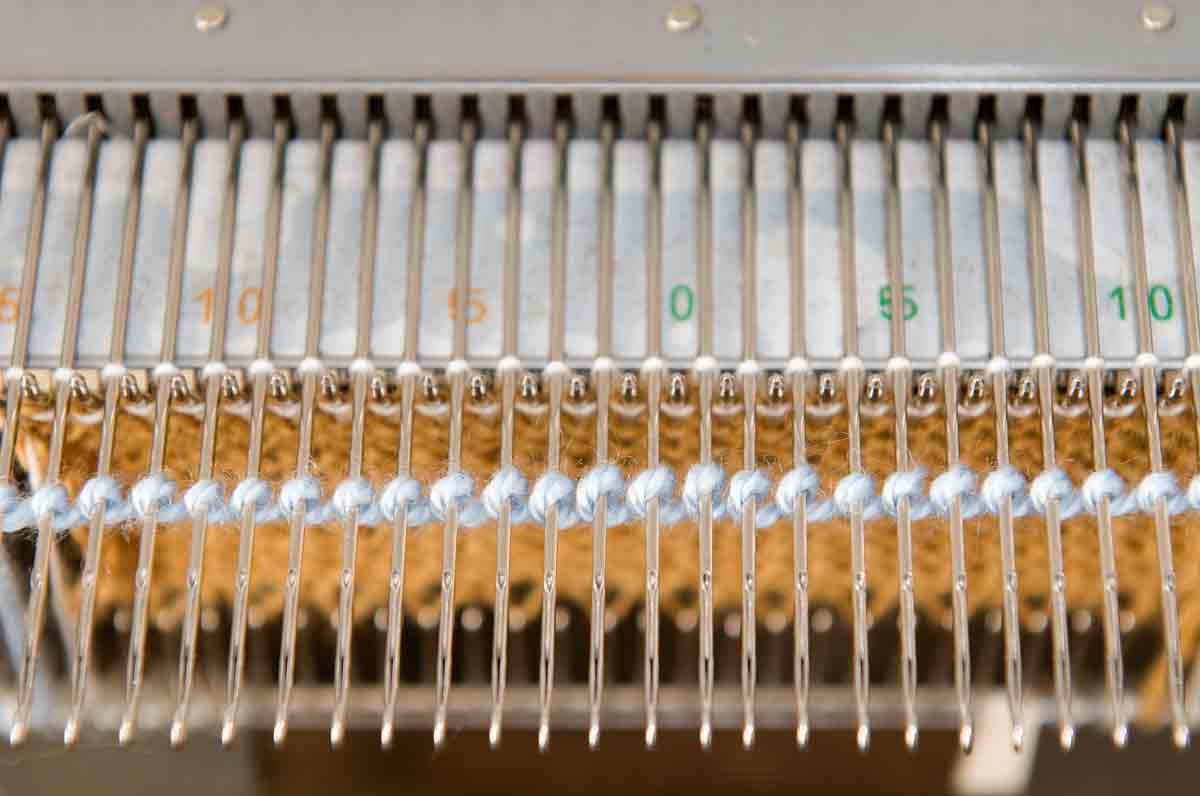
Step 2. E-wrap the working needles starting with a slip knot on the furthest needle from the carriage
Begin with a slip knot the size of an individual loop.


The tension of the e-loops should be not too tight, but not too loose either. If it’s too tight, the machine may have difficulty knitting these loops. If the tension is too loose, the edge of your work will look uneven and messy. It may take some practice to achieve the right tension.
To avoid too much tension of the working yarn when you are making the loops, you can slip the yarn through the clip of the tension unit as shown in the photo below.


Step 3. Thread the carriage with the working yarn.
The next step is to take the working yarn and thread it through the carriage as shown in the photos below.


Step 4. Move the carriage from right to left.


Step 5. Attach the cast-on comb and the weights to the first row of stitches.
At this point, you can attach the cast-on comb and weights to the newly-made stitches. But, you may find it a little difficult to do so because there isn’t enough length of the knitted fabric. To make it easier, you can run the carriage from left to right to gain more length.
To make sure that the machine knits properly without the weights, it’s best to push the working needles all the way out to the holding position again. The stitches (loops) should be pushed all the way back.


Move the carriage across the working needles once or twice more. When the fabric is long enough, you can attach the cast-on comb and the weights.

Step 6. Knit your project.
You can knit your project now.
The photo below shows the e-wrap border. It’s the top border of this small knitting project. When you knit on the machine, the e-wrap border is at the bottom of your work. I turned it upside-down for a better view. The opposite edge has free loops.


Knit and enjoy 🙂