
Table of Contents
- What is an E-Wrap Cast On with an Anchor?
- The Process:
- Step 1. Prepare a temporary anchor swatch with open cast on.
- Step 2. Attach the ravel cord
- Step 3. E-Wrap Cast On
- Set up the working needles and the carriage for the permanent work piece.
- E-wrap the working needles from left to right. Both the ravel cord and the e-wrapped working yarn are on the needles.
- Thread the working yarn through the yarn feeder.
- Knit the work piece. The working fabric is attached to the anchor fabric by the ravel cord. The anchor fabric stabilizes the work.
- Remove the ravel cord to disconnect the permanent part from the anchor.
What is an E-Wrap Cast On with an Anchor?
In some cases, a regular e-wrap cast on can be difficult to handle on a flatbed knitting machine. A very large knitting project, for example, may consist of a long chain of e-loops. Attaching a long cast-on comb and the weights to a long row can be challenging when you have one or two very long rows to work with. To ease this task, a provisional anchor fabric comes to the rescue.
An anchor is a temporary piece of fabric made of waste yarn with the cast-on comb and the weights already attached to it. Affixing an e-wrap cast on to a temporary anchor gives you better control when starting a new knitting project. By doing this, you create a smooth transition from a temporary anchor fabric to the working yarn. This setup makes it easier for the carriage to perform its task, helps avoid potential flaws, and gives a uniform and professional look to the finished edge.
Let’s get started!
The Process:

Step 1. Prepare a temporary anchor swatch with open cast on.
Let’s create a provisional anchor piece using some waste yarn from the stash. As mentioned before, an anchor is a knitted segment long enough to attach a cast on comb and the weights. It is used to pull the actual knitting down and make it easier for the machine to operate.
Set up the working needles and the carriage for an open cast on.
With the carriage on the right, push the needles into the working position (B).
To get started, let’s prepare the needles and the carriage for an open cast on. First, push about 30 needles into the working (B) position. Start with an empty carriage on the right* of the working needles.
* Starting with the carriage on the right side is easier for a right-handed person. If you are left-handed, you can place the carriage on the left and work in the direction opposite of what’s described in this tutorial. Or, you can follow the instructions and change the directions later.

Move the alternating needles to a non-working position (A).
Next, use the 1/1 needle pusher to move the alternating needles back to the non-working position (position A).

Set the holding cam lever in the normal position.
Now, let’s prepare the carriage. Make sure, the holding cam lever on the carriage is in the normal position (N for Brother/Knitking and a triangle for Singer/Studio machines.)

Thread the yarn feeder and the carriage with waste yarn.
With the carriage on the right side of the working needles, thread the waste yarn through the carriage and lock the yarn by moving the yarn feeder lever to the right.

Knit the anchor swatch.
Move the carriage to the left for an open cast on.
Now, the needles and the carriage are ready for an open cast on. To create an open cast on, move the carriage from right to left across the working needles. You can find the detailed description in Blue Cat Tutorial for an open cast on.

Place all needles in the working position (B).
Before you start knitting, push the needles that were in the non-working position (A) back to the working position (B). Use the blunt edge of the needle pusher on the needle butts.

Attach cast-on comb to the loops, add claw weights if necessary.
At this point, we attach the cast-on comb to the loops while keeping the working yarn free (in front of the cast-on comb).

Knit several rows to make a provisional anchor.
Finally, we can knit several rows to produce the temporary piece of fabric. With the weights attached, this helper fabric works as an anchor for our future knitted creation.

Side Note: I realized that I used the photos from the Open Cast On tutorial using blue yarn. My anchor is actually made of brown yarn in this tutorial. And the blue yarn will be the permanent piece from this point. I will update the photos to avoid confusion in the future.
Disconnect the working yarn from the carriage.
First, you need to disconnect the working end of the waste yarn from the carriage and make sure that it hangs freely. You can attach the yarn to your claw weight to keep it from catching by the carriage.
Step 2. Attach the ravel cord
Remove the waste yarn from the yarn feeder and replace it with a ravel cord.
A ravel cord is a thin, sleek, and durable cable used to affix the permanent work to a temporary anchor. Nylon, silk, or linen can be used for this purpose. Thin mercerized cotton cord worked very well for this project.
Thread the ravel cord through the yarn feeder of the carriage.

Knit one row.
Move the carriage from right to left to knit one row with the ravel cord. Only one row is necessary. The ravel cord holds the permanent work to the temporary anchor. The ravel cord will be pulled out later to disconnect the anchor.

Disconnect the ravel cord from the carriage.
After one pass, remove the ravel cord from the carriage.
Step 3. E-Wrap Cast On
Set up the working needles and the carriage for the permanent work piece.
Switch the cam lever to the holding position to move the empty carriage from left to right.
At this point, the empty carriage is on the left side of the working needles. You need to move the carriage to the right in preparation for the e-wrap. To do that, switch the cam lever to the holding position and move the needles into their holding position (E on Brother/Knitking, D on Singer/Studio) as shown in the photos below.


Move the carriage from left to right.
Switch the cam lever on the carriage to the normal position.
And now, switch the cam lever back to the normal position. Please see photo below.

E-wrap the working needles from left to right. Both the ravel cord and the e-wrapped working yarn are on the needles.
Keep the needles in the holding position. It makes it easier to e-wrap the working yarn. In addition, it is easier for the carriage to perform its task at the first raw with the needles in the holding position.
With the carriage on the right, e-wrap your working yarn starting on the left and ending on the right side next to the carriage.
Thread the working yarn through the yarn feeder.
Feed the working yarn into the yarn feeder of the carriage. When you e-wrap the yarn onto the needles, your ravel cord is still on the needles as well. So, you have two layers of loops on your working needles.

Knit the work piece. The working fabric is attached to the anchor fabric by the ravel cord. The anchor fabric stabilizes the work.
Now, you can move the carriage from right to left to knit the first row of the actual work. Because the work is already attached to the anchor piece with tension applied to it by the cast-on comb and the weights, the passage by the carriage is very smooth and easy. You can continue knitting your workpiece until it’s done.
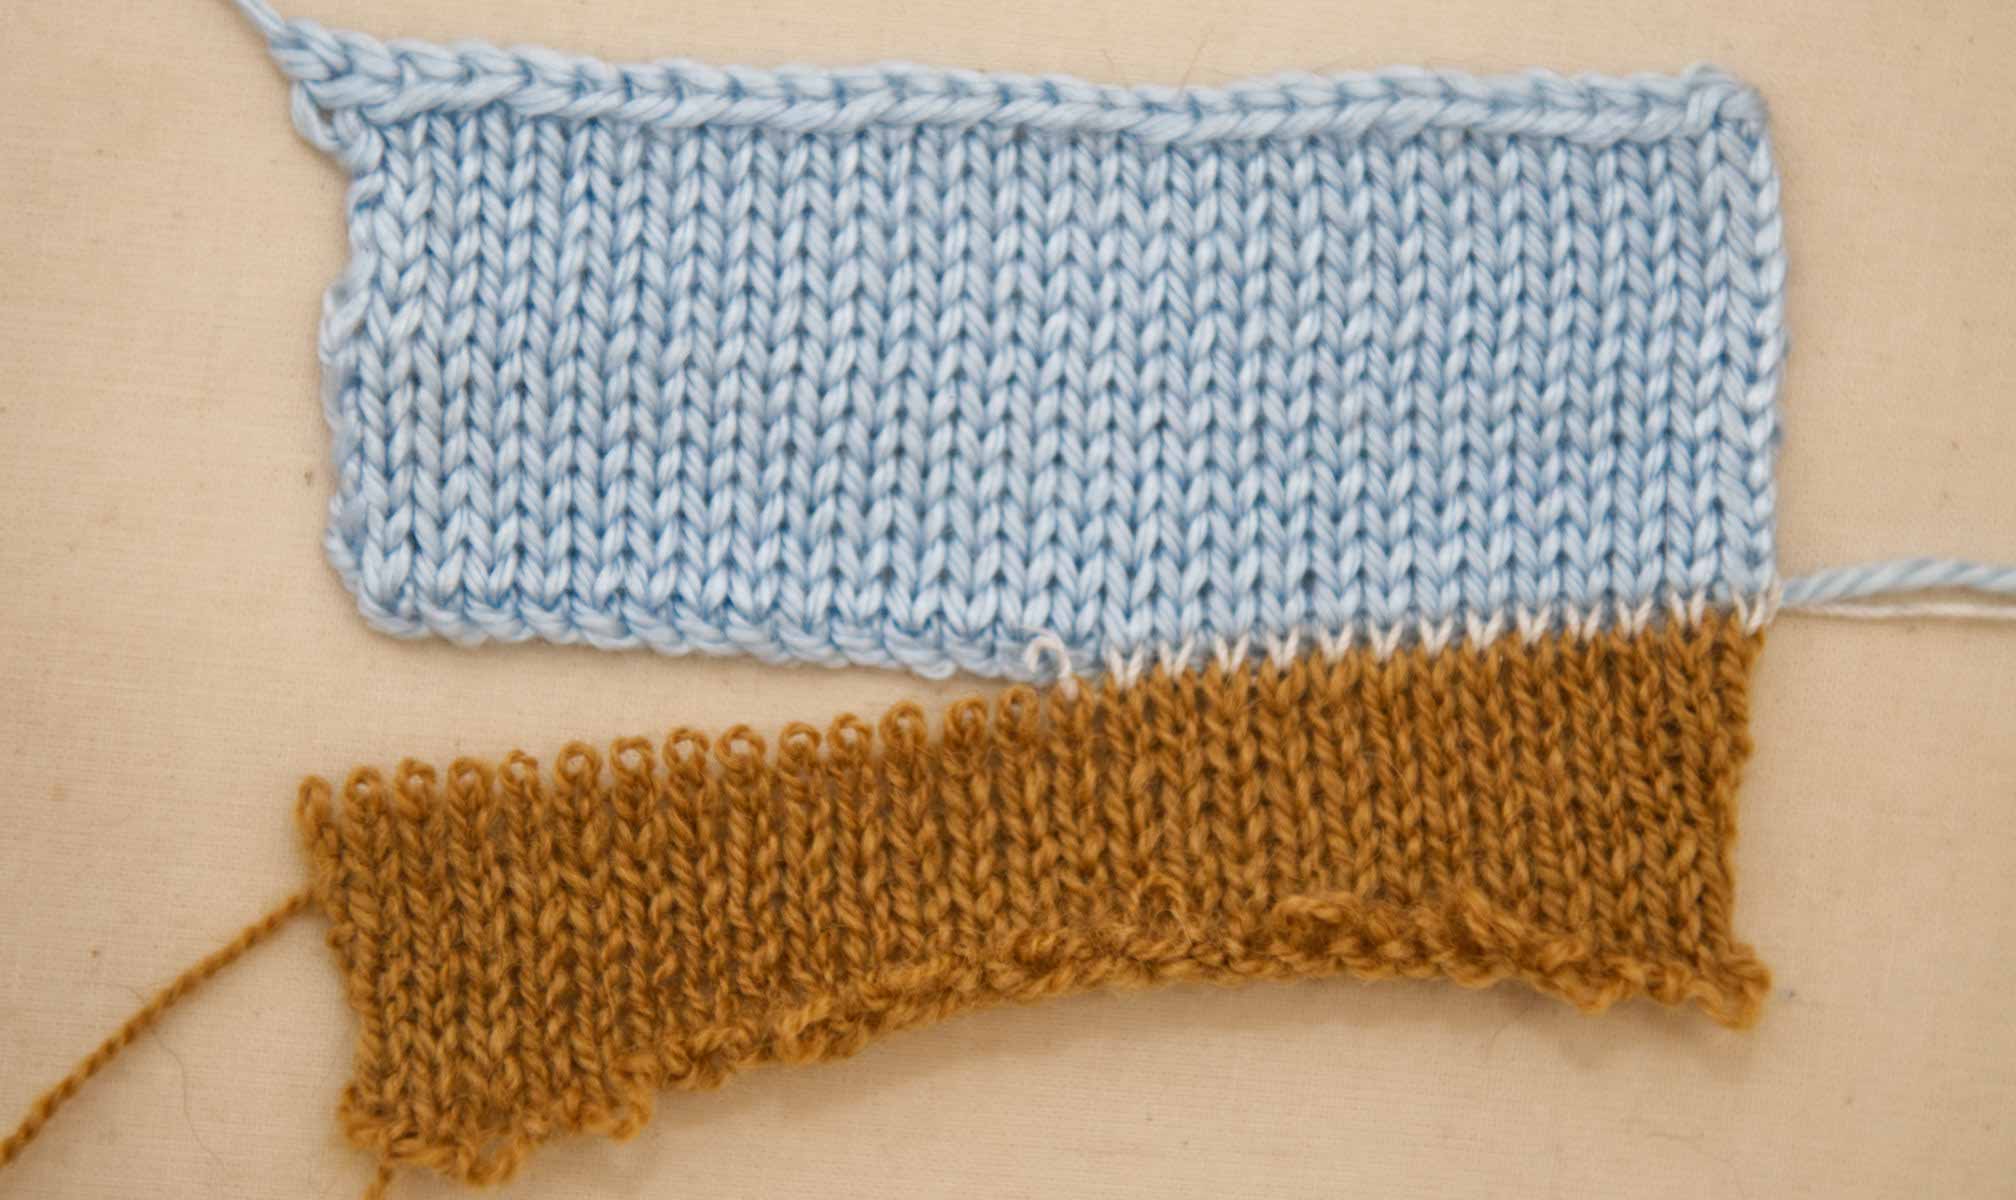
The photo below shows the brown anchor piece with a cast-on comb attached and the actual work in blue yarn. The white ravel cord connecting the two is not seen very well, but it’s there.

For the purpose of this tutorial, I removed the work from the machine and bound it off by hand. I blocked the fabric to keep it from curling. You can easily see the anchor fabric on the bottom, the white ravel cord in the middle, and the actual work fabric in blue.


Side Note:
For some reason, these colors and textures made me think of a corn field with the blue sky in the background.
Hm 🙂
Remove the ravel cord to disconnect the permanent part from the anchor.
The ravel cord can be pulled or cut to free your work.

In the photo below, you can compare the cast-off (top) done by hand with the e-wrap cast on (bottom). The manual cast-off looks like a braid while the e-wrap cast on looks like a rope. Both look very nice.

Below is another view of the e-wrap cast on.
