
How many times have you drafted a bodice pattern following instructions, only to have your head spinning at the end of this project and still not understanding how you got there? I’ve done it too many times. So, I decided to make changes in my approach to the pattern drafting to save time and eliminate the fatigue and frustration.
What makes my approach simple is that you are working on one section at a time until finished. It takes you only a few seconds to complete each section. (May be, with the exception of the arm and neckline curves simply because you need to exercise some care and take time to make the curves smooth.) Also, if one measurement is used in different parts of the block, this measurement is used all at once, and you don’t have to look it up or calculate it again.
If it does not make sense right now, do not fret. It will all come together once you try to follow the directions and draw the pattern this way.
You will need large pattern paper (or any other large paper from a roll). I use medical office lining paper because it is transparent and cheap. Optional: self-healing cutting mat. I lay my transparent (parchment like) paper on the mat. This way, I can see the grid through the transparency of the paper. It works very well.
You’ll also need a long ruler, pencil, eraser, French curve, and a measuring tape to take your measurements if you have not done it yet.
Measurements
You will need only nine measurements for this project. The detailed description of the measurements can be found in a separate post (coming up soon).
Below is the list of the parameters.
Horizontal Measurements:
- Neck Circumference – full circle around the neck at the nape.
- Bust Circumference – full circle around the fullest part of the bust.
- Waist Circumference – full circle around the narrowest part of the torso.
- Bust Span – bust point to bust point.
- Shoulder Length – nape of the neck to the shoulder tip.
- Back width – distance from arm to arm at the scapula (shoulder blade) level.
Vertical Measurements
- Armscye Depth – nape of the neck to the shoulder blade line where the back width was measured.
- Bust Height – shoulder to bust point (the highest point of the bust).
- Waist Height – nape of the neck to waist in the back.
Now, that we have all the measurements, let’s start building the block.
Neck, Bust, and Waist Lines, Guidelines
Mark a starting point S close to the top left corner of your paper leaving some space around the starting point. From this point, draw a vertical line extending above and below it.
The vertical line is the Center Back of the block and the grainline of the back pattern.

Markings on the Center Back Line:
- N1: Neckline: Measure 1.5 cm (5/8″) above the starting point S – mark this point N1. (N for neck.)
- S1: Sleeve/Shoulder Head Guideline: Divide the armscye depth measurement by 5 and subtract 0.5 cm (1/8″). Mark this distance from starting point S measuring down as point S1(S for sleeve and shoulder).
- D1: Shoulder Dart Guideline: Mark point D1 15cm (6″) down from starting point S, on the Center Back Line. (D for dart.)
- A1: Armscye Line: Add 0.5cm (1/8″) the Armscye Depth. Measuring from point S down, mark this distance on the Center Back line. Label this point as A1 (A for arm/armscye).
- B1: Bustline: From point N1, measure down the Bust Height. M mark this point B1 (B for bust).
- W1: Waistline: Measure the Waist Height down from starting point S, and mark it W1 (waist).

Here is the summary of the vertical distances:

Now, that we marked all necessary points on the Center Back line, let’s move on to the horizontal measurements and the Center Front.
Horizontal Lines:
We will be using Adjusted Bust Circumference:
Adjusted Bust Circumference = ½ (Bust Circumference + Ease)
Only one half of the Bust Circumference and Ease are used for the pattern because the pattern is made for one half of the garment. The Center Back and Center Front are the lines running through the middle of the body. The lines will coincide with the midline of the garment.
The same holds true for the ease. Only half the ease is used on the half of the pattern. For example, if the ease to the bust is 6 cm (2 1/5″), add 3 cm (11/4″). Remember to halve the amount of ease, before adding it to your half bust circumference.
Build the Block Using Adjusted Bust Circumference
- Block: Draw horizontal lines equal to Adjusted Bust Circumference from points N1 and W1 to the right. Mark endpoints as N2 and W2, respectively. Connect N2 and W2 to form a rectangle. The vertical line on the right is the Center Front line.
- Sleeve Head Guideline: Draw a horizontal line from point S1. This is only a guideline. It does not need to have a specific length.
- Back Shoulder Dart Guideline: Draw a horizontal line from point D1. Same as above, this is just a guideline. It does not have to be a specific length.
- Armscye Line, Bust Line: Draw horizontal lines from points A1 and B1 to the Center Front. Label the intersection points as A2 and B2, respectively.

To summarize:

The only horizontal line, that we have not included yet, is the Front Shoulder Guideline. You will see very soon, why it is added later.

Now, that we’ve built the basic block, we can move on to the outlines of the pattern starting with the Back and Front Necklines.
Back and Front Necklines
On the Neck and Shoulder Line:
The measurement used for this section is the Neck Circumference divided by 5. It is easy to see that the back neckline should coincide with the front neckline at the shoulder seams. That’s why, the same measurement is used for both.
- N3: Back Neckline: Mark 1/5 of Neck Circumference from point N1 to the right. This will be point N3.
- N4: Front Neckline: Mark 1/5 of Neck Circumference from point N2 to the left. This is point N4.

On the Center Front Line:
- Front Neckline: Mark 1/5 of Neck Circumference (same measurement) from point N2 down. Mark as N5.

In summary:

- Front Shoulder Guideline: Mark a point 0.5 cm (1/8″) up from N5 on the Center Front line and draw a horizontal line from this point. This is just a guideline, so it doesn’t have to be a specific length.

As you can see, we used the same measurement in two corners and the Front Neckline mark was used as a starting point for the Front Shoulder Dart Guideline. Easy!
Necklines
Connect points N1 and N3 with a smooth shallow curve to form the back neckline. Check that the line is at the right angles* at the Center Back line and the shoulder seam.
Connect N4 and N5 with a deep curve keeping the right angles* at the seams. This is the front neckline.
* When working with curved lines, always check that they come to a right angle when they meet a straight seam or fold (for example, the center front, center back, or the side seam). By doing this, you ensure that you will get a nice smooth curve where the back and front necklines join.

We continue working in the upper section of the block around the neck and shoulders. Let’s move on to the seams and darts.
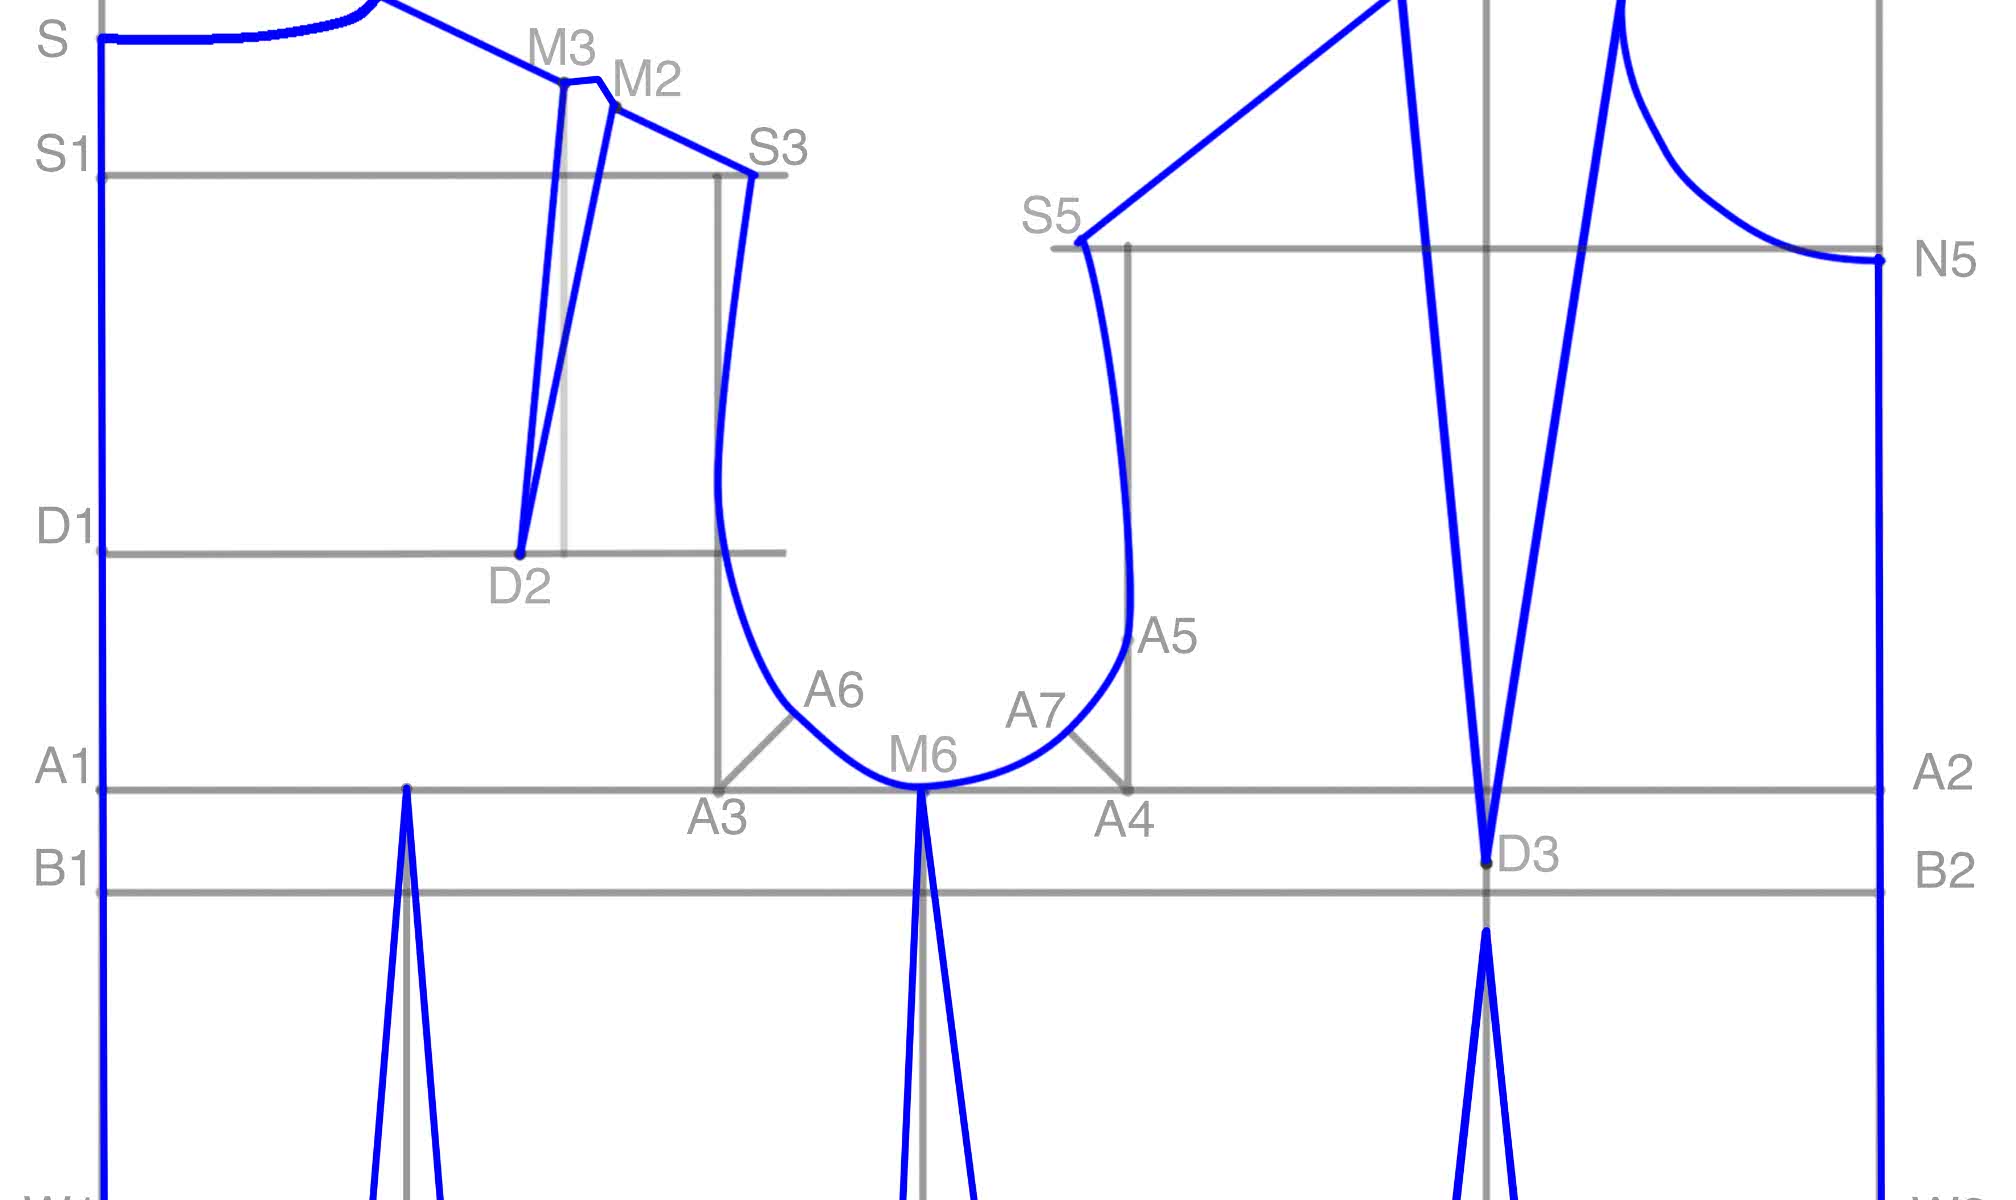
Back Shoulder Seam and Dart
Add 1.5 cm (1/2″) to the Shoulder Length (this is the allowance for the shoulder dart). Use a ruler to pivot this distance from point N3 until your measurement passes through the Sleeve Head Guideline (the horizontal line drawn from point A1). Draw a straight line to create your shoulder line. Label the endpoint S3.

Mark M3 the midpoint of the back shoulder seam (line N3S3). Mark a point 1.5 cm (1/2″) from M3 toward S3 (to the right) and label as point M1. Draw a vertical line from midpoint M3 down to the Back Shoulder Dart Guideline. Mark a point 3 cm (1 ¼”) from the intersection point toward the Center Back and label as point D2. D2 becomes the point of the back shoulder dart.

Connect M3 to D2 and M2 to D2 to create the dart arms.
At this point, the shoulder segment of the dart (connection between M3 and M2) and the auxiliary vertical line can be erased.
Summary:


Let’s move on to the front shoulder and dart. First, we need to mark the Bust Point.
Mark the Bust Point
Divide the Bust Span by two (as we are working on the half) and add 0.5 cm (1/8″) (allocated ease).
Measure this distance from point B2 to the left on the bust line. Mark it as the Bust Point.

Draw a vertical line passing through the Bust Point and intersecting all your horizontal lines. This is the Vertical Bust Line.

Mark point D3 1 cm (3/8″) above the Bust Point on the Vertical Bust Line. This will be the point of your dart.

Front Shoulder Dart
This equation is from Burda Style tutorial.
Add or subtract 0.6 cm (1/8″) to 7 cm (2 3/4″) for each 4 cm (1 1/2″) bust increment above or below 88 cm (34 1/2″). For bigger busts you will need a larger dart (add to 7 cm), and for a smaller bust you will need a small dart (therefore subtract from 7 cm).
For example, if your bust circumference is 84 cm (33″), which is 4 cm (1 1/2″) below 88 cm (34 1/2″), you need to subtract 0.6 cm (1/8″) from 7 cm (2 3/4″), leaving a dart width of 6.4 cm (2 1/2″).
Use this dart width calculation to mark this distance from N4 as point S4.
Connect S4 and N4 to D3 with straight lines to create the front shoulder dart.

Front Shoulder Seam
Using a ruler, pivot from point S4 the Shoulder Length until it crosses the Front Sleeve Head Guideline (Front Shoulder Guideline). Draw a straight line creating your front shoulder line. Mark the end point S5.

Drafting the Armhole
On the Armscye Line (A1A2), measure the distance of half of the Back Width plus 0.5 cm (allocated ease) from point A1. Mark this point A3. Draw a vertical line from point A3 upwards until it reaches Sleeve Head Guideline. Find a midpoint between A3 and the intersection with the Sleeve Head Guideline. Mark this point M5.

Take the distance from the Center Front to Bust Point (i.e length from B2 to the Vertical Bust Line or half Bust Span plus 0.5 cm) and mark this distance on Armscye Line, measuring from the dart arm closest to Center Back. Mark this point A4.
Draw a vertical line from point A4 upwards until it intercepts with the front shoulder seam.
Divide Armscye Depth by 5. Mark this distance on the line just drawn from A4, as point A5.

Find the midpoint of the line between A3 and A4 and mark as M6.
Draw diagonal lines (lines drawn at a 45-degree angle) inwards from points A3 and A4. From A3 the line is 2.5 cm long (1″) (mark endpoint as A6), and from A4 – 1.5 cm long (1/2″) (mark endpoint as A7). These diagonal lines will help in the next step, when we draw the armhole curve.

Summary of Measurements:

Connect points S3, M5, A6, M6, A7, A5, and S5 with a smooth line.

Creating Waist Darts
At this point, the Waist Line is the same length as the Bust Line. Our Bust Circumference, however, is usually greater than our Waist Circumference. To remove this excess girth from the waist and to create a well-tailored pattern we need to make waist darts (one in the back – remember this is on the half so when you make your block there will be two in the back, and one in the front, as well as slightly tapering side seam, which we will also treat as a dart at this point).
Dart Width Calculation
Subtract Waist Circumference from Bust Circumference and divide it by 2. Add 2 cm (7/8″) ease (which adds a total ease of 4 cm (1 1/2″) throughout the waistline).
Divide this number by three, so that it can be distributed evenly throughout the back dart, front dart, and the side seam. This is the dart depth (width).
Back Waist Dart
To mark the placement of the back waist dart, find the midpoint of line A1A3 and label as D4. Draw a vertical line from this point so that line intersects the Waist Line (W1W2). Mark the point of intersection as point W4. This will become the center of your back dart.

Distribute the dart depth evenly on either side of W4 and join endpoints to D4 to create dart arms.

Side Seam
Draw a vertical line from M6 until it intersects the Waistline (W1W2). Mark the intersection point as W3.

For simplicity treat the side seam (line M6W3) as a dart at this point. Distribute one third of the dart depth to the back of the bodice and two-thirds to front of the bodice, either side of W3. Join the endpoints to M6 to create the front and back side seams.

Front Waist Dart
Mark the intersection point between the vertical bust line and the waist line as W5. Distribute dart depth evenly each side of W5 and join the endpoints to a point 1cm (3/8″) below the Bust line to create dart arms.

Balance the Waistline
At this point the waistline of the pattern is straight. But as the front of our bodice must pass over the fullest part of the chest (the bust), we need to add a little extra length to our Center Front, to prevent this part of the waistline from riding up when the bodice is made.
Mark a point 0.5 cm (1/8″) to 1.5cm (1/2″) down from point W2.
(0.5 cm (1/8″) for small bust / 1 cm (3/8″) for medium bust / 1.5 cm (1/2″) for large bust)
Connect point W1 to point W6. Extend the dart arms to reach the adjusted waistline.

Complete the pattern outline by connecting S to W1 and N5 to W6. And finish the darts by capping them.

Trace the pattern
The pattern is done. All you need to do now, is trace the front and back parts of the pattern onto separate pieces of semi-transparent paper including all details.